MIDI-F4 MIDI CC Controller Manual0. Connecting the Device1. Control Panel Overview2. Compatible DAW SoftwareStudio One Setup GuideAbleton Live Setup GuideLogic Pro Setup GuideCubase Setup GuideFL Studio Setup GuideReaper Setup GuideCakeWalk Sonar Setup Guide3. Channel & Mode: 3-Position Toggle Switch & 16-Position Rotary Switch3.1 MIDI Channel Selection3.2 Operation Modes4. Configuring Fader MIDI CC Output4.1 Verifying Output with MidiView MonitorDownload MIDI VIEW Software4.2 Adjusting Fader MIDI CC Assignments5. LED Lighting Control
MIDI-F4 MIDI CC Controller Manual
0. Connecting the Device
- Connect the controller to your computer via USB cable. Both USB Type-A and USB Type-C ports are supported.
- Compatible with macOS, Windows, Linux, and other major operating systems.
- No driver installation required. The device is automatically recognized by music software upon connection.
1. Control Panel Overview
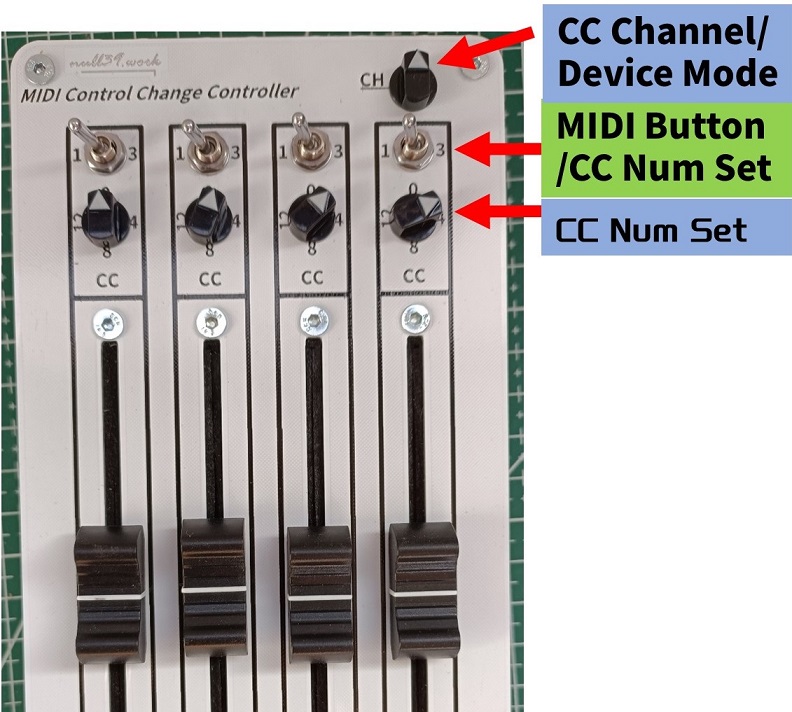
2. Compatible DAW Software
This device is designed for mixer (MixConsole) control in most DAW software, and also supports real-time MIDI CC input — such as drawing string expression curves in Cubase. Common use cases include adjusting track volume, left/right panning, knob parameters, and controlling supported MIDI-compatible plugins. The links below provide brief guides for assigning device functions in various DAWs:
Studio One Setup Guide
Ableton Live Setup Guide
Logic Pro Setup Guide
Cubase Setup Guide
FL Studio Setup Guide
Reaper Setup Guide
CakeWalk Sonar Setup Guide
- Note: The device is incompatible with Pro Tools, as Pro Tools does not support legacy MIDI protocols and requires HUI (Human User Interface) protocol compliance for hardware control.
- Note: In Samplitude, the device cannot be used to control parameters such as fader levels, but it supports MIDI CC input for drawing CC automation curves.
3. Channel & Mode: 3-Position Toggle Switch & 16-Position Rotary Switch
3.1 MIDI Channel Selection
The 16-position rotary switch at the top right of the control panel is used to select the MIDI channel. When the switch is pointed to the topmost position, the device operates on MIDI Channel 1. Rotating the switch clockwise increments the channel by 1 per step, covering channels 1–16.
The switch has no rotational stop and can be turned clockwise or counterclockwise freely. We recommend using the included adjustment tool to turn the switch.
3.2 Operation Modes
The device has two operating modes determined by the 16-position channel switch:
- Mode 1: Activated when the channel switch is set to Channels 1–8 In this mode, both the 3-position toggle switch and the 16-position rotary switch are used to adjust the MIDI CC number assigned to the corresponding fader.
- Mode 2: Activated when the channel switch is set to Channels 9–16 In this mode, the 3-position toggle switch functions as a MIDI on/off toggle, while the 16-position rotary switch remains dedicated to adjusting the fader's MIDI CC number.
4. Configuring Fader MIDI CC Output
When using the device to control specific MIDI CC messages — such as inputting CC data or drawing string expression curves in Cubase — you must assign a specific MIDI CC number to each fader.
4.1 Verifying Output with MidiView Monitor
We strongly recommend using this tool (or equivalent utilities) to verify the real-time MIDI CC output of the device. This is extremely helpful for adjusting the CC numbers assigned to each fader. Since configuration changes are not visually reflected on the hardware, the monitor lets you confirm whether settings are applied correctly.

This software supports both macOS and Windows. Windows Note: Ensure the MIDI device is not already in use by another application when launching the monitor.
Download MIDI VIEW Software
4.2 Adjusting Fader MIDI CC Assignments
As outlined in Section 1, the MIDI CC number sent by each fader is controlled by the 16-position rotary switch and the 3-position toggle switch, following these rules:
- The 3-position toggle switch only affects CC assignments when the global channel switch is set to Channels 1–8 (Mode 1). The 16-position rotary switch adjusts CC numbers in all modes.
- When the 3-position toggle switch is set to Position 1, and the 16-position rotary switch is pointed to the topmost position: the fader outputs CC 0.
- Rotating the 16-position rotary switch clockwise increments the assigned CC number by 1 per step. The switch has no rotational stop, so continuous rotation in one direction will cycle through available CC values.
- Switching the 3-position toggle to Position 2 adds 16 to the base CC number; switching to Position 3 adds another 16. The maximum assignable CC number is CC 64.
5. LED Lighting Control
The device's LED lighting is configured concurrently when selecting the MIDI channel via the 16-position channel rotary switch (labeled "CH") located at the top right of the control panel.